
So you’ve landed your first gig as a 2nd camera assistant (aka clapper loader) and you’re wondering what tools you will need? If you are coming from a trainee, a camera PA or a runner position, chances are you already have a pretty good idea of the tools and consumables you will be needing. The right tools depend heavily on the gear you will be working with and the type of shoot, but there are certain essentials you’ll need almost every time.
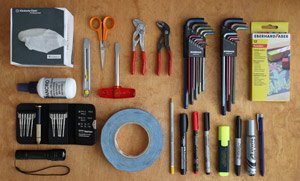
Building an AC toolset is a process that continues for as long as you are on the job. Camera assisting tools are such a wonderfully random mix that it’s hard to get them all at once. I mean, where else will you find a hairdryer, shower caps, chalk and allen keys all in one bag? Fret not, for with just a quick Amazon spree you can get all the essentials to get you started. Here are the top 15 tools you will need on set:
Bag
A good set bag, also known as a floor bag, is more important than you think. The bag is the foundation of your kit. Apart from holding your tools and consumables, it is also home to all the pieces of gear you’d like to keep within hands reach during the shoot – batteries, filters, memory cards, spare cables, etc. There are as many types of bags as there are styles of working. Chances are, your first bag will not be your last. As you gain experience and see what works and what doesn’t, you will most likely accumulate a range of bags to suit different projects. Some of the most popular choices are:

Tool Totes
Many camera assistants start off with tool totes for their first set bags and for a good reason. These bags come in various shapes and sizes and are cheap and sturdy. They are made to lug heavy tools around building sites, so they fit right at home in a busy production environment. They usually have a variety of small pockets in addition to a single big compartment ideal for bulkier items like batteries.
Tool totes come in rigid open-top, softer zippable versions and everything in between. Each model has it’s advantages and drawbacks, so you have to consider your working style before you get one. Open top bags are faster to access, but provide less protection from the elements. Zippable bags are not as fast, but the chances of spilling a bunch of expensive gear from them is smaller.
Dedicated AC Bags
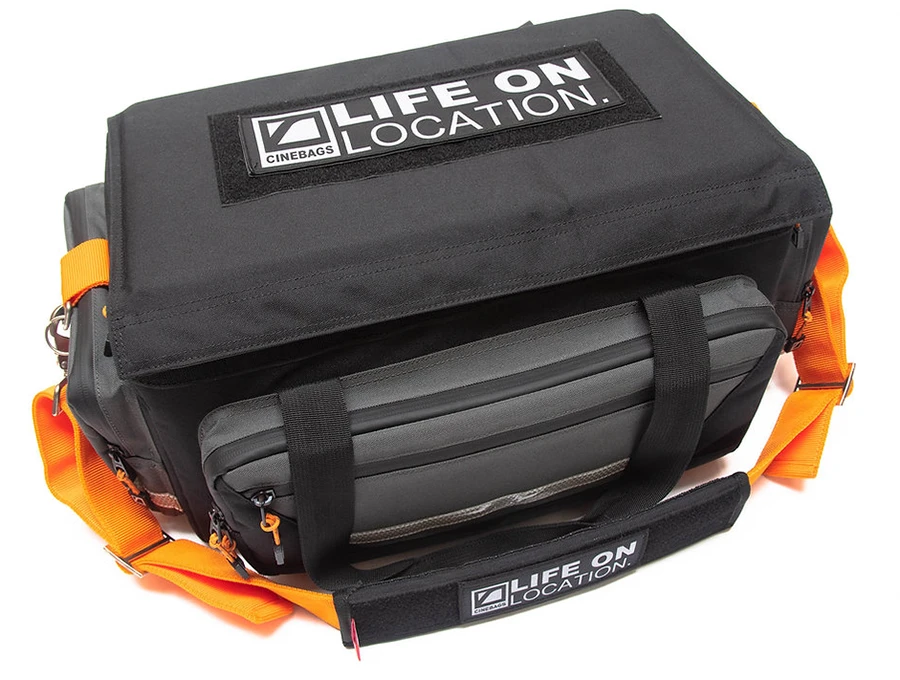
Up the scale, we have dedicated camera assistant bags like the Panavision you are bound to see on any bigger film set. Sturdy and well padded, these bags are purposely built for production. Ridgid enough to protect cameras and lenses in transport, these bags do not come cheap. Because these bags tend to have rather large main compartments, you might find pieces of equipment need to nest side by side. A Domke wrap or two are perfect for providing low-profile padding in such cases.
In addition to Panavision, Arri and Cinebags also offer a comprehensive set bag line-up. Both Panavision and Cinebags offer comprehensive systems of dividers and pouches to help you organize your tools and equipment. More recently, Shape (of handheld handles fame) and O’Connor (yes, tripods-and-heads O’Connor) also entered the camera assistant bag market with some solid models.

Hard Cases
More and more we’ve been seeing AC opting for hard plastic cases as floor bags. Compared to the other two options, hard cases provide a lot more protection for rougher shoots. They are ideal if you have to ship or fly with your kit. Some camera assistants even mount a quick release receptacle (Ronford Baker RBQ for example) on the lid. This makes the case an ideal place to keep the camera when working far from the carts. A hard case is also a handy place to sit if you get a chance.
On the other hand, even empty the cases are a lot heavier than AC bags or tool totes. Add some gear and the weight can get prohibitive. Even if you get a case with wheels (which we strongly recommend), you might have a tough time lugging the case over rough terrain. Hard case prices are on par with AC bags like the Panavision, so a decision between the two is purely workflow-based.
The Pelican 1510 is a very popular choice, due to its carry-on size. The mobility version shown above builds upon the original model with beefier wheels, sturdier handle and a stability-enhancing foot at the bottom. For a lighter option, you can also look at the Air version of the same case – the Peli 1535, which is 40% lighter than the 1510. Another option is the iM2500 model, formerly manufactured by Hardigg, which Peli acquired in 2009. Its biggest advantage are the silent press-and-pull latches which allow you to stealthily open and close the case while the sound is rolling.
Which one? As discussed above, every one of the options has its advantages and disadvantages. If you’re just starting out and you’re not sure of the way you will be working, it’s not worth investing a whole lot into a bag just yet. Get a cheaper tool tote and go from there. On the other hand, if you’ve spent some time as a trainee and have a good idea of the setup you want, you might as well bite the bullet and get your dream bag right away.
In a pinch? A bag is a bag, so if you don’t have a lot to spend on one specifically for camera assistant work, you can make do with just about anything. For example, an older, larger camera bag is an ideal starter AC bag. Check your garage, attic or the local thrift store. Another option is a sturdier cooler bag, these can be found in any big box store or again, a thrift shop. You will probably have to get creative with padding and dividers, but that’s half of the fun. A third option can be fishing tackle bags, which come prepared to handle the plethora of small bits and bobs that make up an ACs toolkit.
AC Pouch / Belt / Harness
An AC pouch is another key item that determines your effectiveness and workflow. It usually lives on a belt around your waist or on a chest harness and contains your most used tools and accessories. As with bags, different camera assistants have different preferences. It’s a matter of experience to land on your optimal setup. Some of the tools in this line up will live in your pouch, others will reside in the bag.
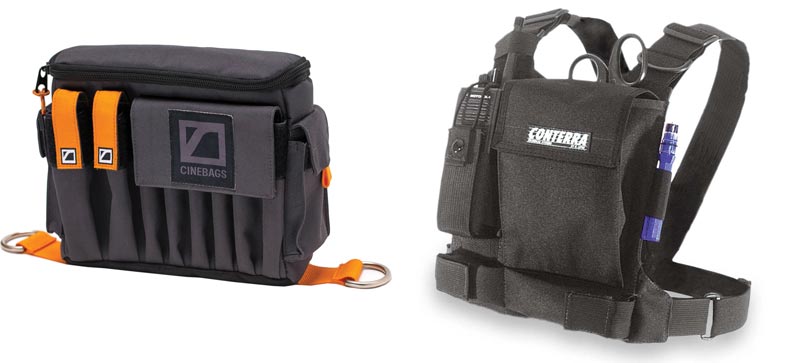
Which one? There are a plethora of AC pouches on the market, but they are more or less similar in their functionality. We like the Cinebags CB07, Panavision’s Loader Pouch and Arri’s Camera Assistant Pouch. Another, more budget-friendly option is the SetWear Jumbo AC pouch. In addition to a pouch, you will also need a belt to attach it to, pretty much any utility belt will do. Your radio, roll of tape and whatever else you deem essential will also reside on the belt.
An AC belt is always a work in progress, so over time, you will probably change your setup quite a bit. A lot of assistants add clips or smaller pouches to help spread the weight. A radio pouch is a popular addition, since the built-in radio clips are often not reliable enough. Another popular addition to an AC belt is a water bottle holder, which can also dub as a compressed air can pouch.
A lot of assistants, grips and lighting techs opt for a chest pouch like the Conterra Tool Chest instead of a belt. On tight sets, in vehicles or when climbing is involved a chest harness can be much less obtrusive than a belt with bulky pouches.
In a pinch? Any garden variety fanny pack will do for starters. Beware, it’s a tell-tale sign for a newbie AC.
Markers & Pens
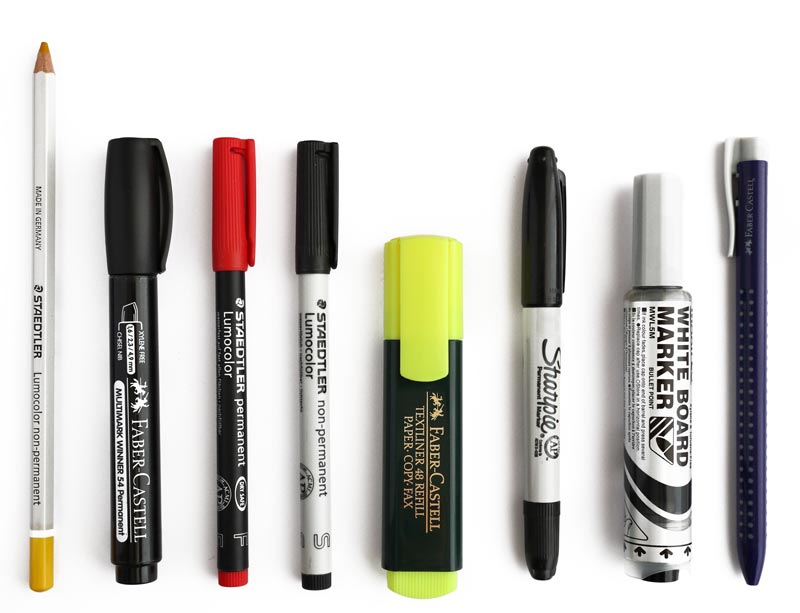
The first thing that you see when you open any camera assistant’s pouch is a bunch of different pens and markers. As with the other items on the list, there’s a touch of personal preference here too, but here are the basics:
- Sharpies – pretty self-explanatory why you need those, the twin tip ones are nicer
- Dry-erase markers – for marking the slate. Make sure you get more than one, there’s nothing worse than finding your whiteboard marker missing just as you hear “Roll sound!” Avery’s Marks-a-lot is the best we’ve used. Get some erasers too, to make your life easier, while you are at it.
- Regular pen – for filling out paperwork – deal memos, overtime sheets, camera reports, etc. Again, have multiple as you’re bound to lend it to someone and never see it again. Camera assistants are the first people anyone on set goes to for pens and markers. A nice, smooth rolling pen will earn you extra brownie points with a script superviser or an AD in distress.
- Pencil – For when all else fails! If you have to fill in camera reports the old school way, doing it in pencil means you can easily go back and change stuff you mess up (unless you are dealing with a carbon-copy pad in which case you’re screwed).
- Highlighter – makes going over equipment and shipping lists that much easier.
- Chinagraphs – mostly used by 1st ACs for making focus marks on lens barrels, it’s useful to keep those handy. As lens barrels are almost always black (unless, you know, Hawk) you’ll be needing lighter colours.
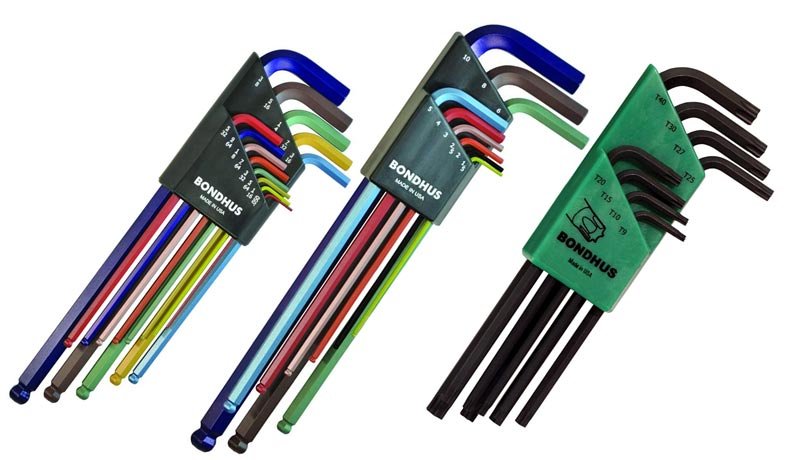
Allen & Torx Keys
The vast majority of fasteners found on camera and grip gear are allen key (hexagonal socket) and torx (star) headed bolts. Notable exceptions are snap-plate screws, which are usually large slotted screws. As camera equipment is manufactured all over the world, you’ll encounter both metric and imperial fasteners. Some manufacturers are more standardized than others. For example, Arri’s cameras and periphery utilize 3 and 4mm head screws almost exclusively.
Which ones? In order to be prepared for any piece of gear you might have to work with, it’s best to get a comprehensive set of both imperial and metric keys. Our favorite is the color-coded Bondhus set pictured above. The color coding greatly improves speed as you get to associate the bolts to the keys. In addition to those, you need to get a torx set like the Bondhus 8-key one. Some camera assistants opt for folding key sets. They are cheaper and lighter, but we’ve found them a bit less convenient to work with.
In a pinch? Most hardware stores stock allen keys, so you shouldn’t have too much trouble finding some. If you can’t find all the sizes you are looking for, one of these big screwdriver bit sets is likely going to have them all. Beware that you might not be able to reach some recessed screws with those, so double check before you get in trouble.
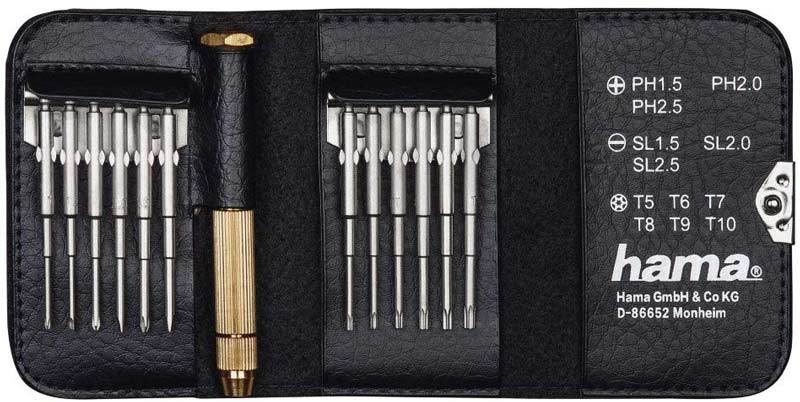
Precision Screwdrivers
Even though most of the camera hardware uses hex socket screws, you will still encounter plenty of regular slotted and Phillips head screws. These are mostly found on monitor screen protectors, battery covers and such. In addition, there are more and more small torx fasteners used on all sorts of accessories. Therefore, it’s a good idea to have a set of good quality precision screwdrivers on hand.
Which ones? We like this set by Hama, it’s compact, good quality and has the most used sizes. If you are feeling fancy, you can’t go wrong with a Wiha set. You can also opt for a larger set with more bits like this one.
In a pinch? Most hardware stores will have some form of a precision screwdriver set. Even the cheapest ones will probably have the most necessary bits, although it’s usually worth spending a bit more.
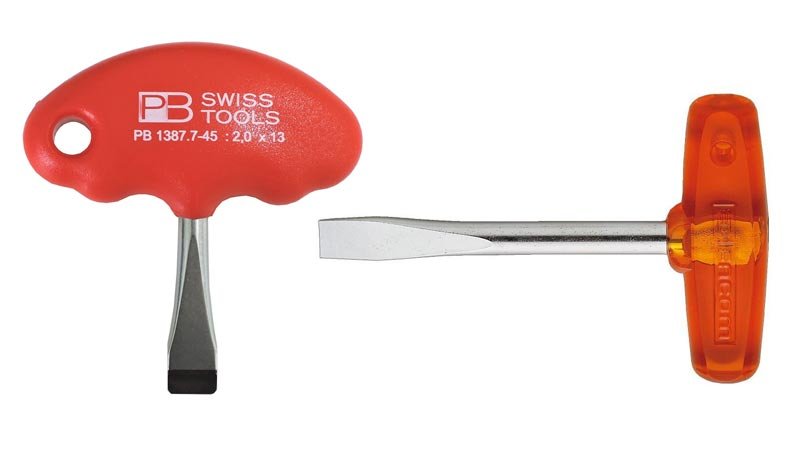
T-handle Slot Screwdriver
Pretty much all camera packages you will be working with use some form of quick-release system. More often than not, the quick release plates are attached to the camera with large slotted 3/8″ screws. It’s vital for safety that these screws are well tightened. To do this properly, you need a large slotted T-handle screwdriver. We’ve seen countless mangled snap plate screws that have been tightened or loosened with improper tools. Large slotted screwdrivers are also indispensable when installing and removing 1/4″ to 3/8″ insert adapters.
Which one? The de-facto industry standards are the Facom 8×100 and the PB Swiss. Some Leatherman models like the Surge also come with suitable tools, but again, they may not prove the most comfortable option. Smallrig and Victorinox also make combined tools that feature flat screwdrivers.
In a pinch? You can try a regular wide slotted screwdriver, most hardware stores stock them. They are usually ridiculously long, making them far less convenient to work with. Still better than none. Make sure you get one with thin enough blade as some bolt and adaptor slots are really narrow.

Adjustable Spanner Wrench
An adjustable spanner is another key tool that you need to be able to construct a safe and efficient camera rig. You need a spanner to tighten things like magic arms, tripod leg adjusters, thread converters and certain cable connectors. Technically, you can do that with a set of fixed spanners, but a good quality adjustable one is that much more flexible. As you will be getting into some tight spaces, get a smaller wrench with the slimmest jaws you can find.
Which one? The Channellock pictured above is a good option, as it goes to 1 1/2 inches (38mm) wide with jaws just 3/16 in. (4.76mm) thick. An excellent alternative to adjustable spanner wrenches is the Knipex series of plier wrenches. For camera assistant work, the 5 inch model excels with 7/8 in. (23mm) jaws just over 0.1 in (3mm) thick. In addition to wrench duty, the Knipex are amazingly useful as general pliers.
In a pinch? Regular small size hardware store adjustable spanner will work for most things. You probably have one kicking around the toolbox at home. Another option is to find out which sizes you’ll be needing and get the appropriate spanners for them.
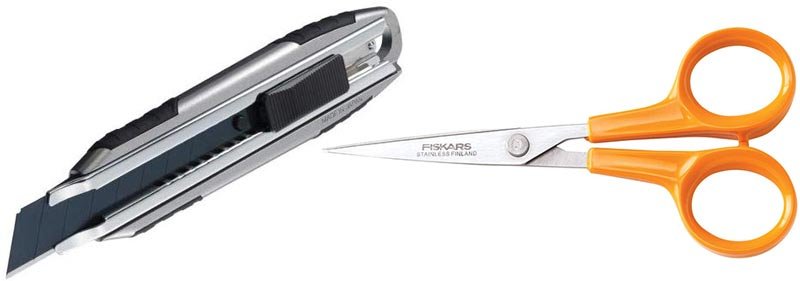
Knife & Scissors
Sooner or later you’ll need to cut something on set. Whether you will be designing rain covers out of plastic sheeting or constructing sun shades out of correx, you will need sharp precise cutting tools. A snap blade utility knife is a practical tool to have in your kit. As for scissors, you will need a small, sharp pair capable of shearing through multiple layers of camera tape, velcro or plastic.
Which one? A sturdy, snap blade utility knife like the Olfa MXP-L above is a good choice for heavy-duty cutting. If you want to go lighter the Olfa SVR-2 9mm knife is an excellent choice for precise, delicate work. Do not forget to purchase the appropriate spare blades for the knife you pick, Olfa blades are second to none in terms of sharpness and durability.
The Fiskars Stitcher Scissors (No. 5) is our personal favorite. You can replace both of these (and more) with a Leatherman, but nothing beats a dedicated tool for the job.
In a pinch? Go through your desk, kitchen drawer and toolbox. Chances are you already have at least one utility knife and probably some form of small scissors. If not, hit the local stationery store for a quick fix.

Pliers / Multitool
You’d be hard-pressed to walk on set and find a member of the camera, grip or lighting departments without one of those on their belt. Even though we believe that having the proper tool for each job is ultimately best, having one of these around is certainly useful. Even if you normally work with separate tools, a multitool can get you out of trouble should you lose your T-handle or scissors. It doesn’t hurt that the pliers are top-notch, too.
Which one? Leathermans are the most popular choice, but Victorinox makes a very capable contender. SOG’s models are also very highly rated and a bit easier on the budget, although harder to come by. If you are set on getting separate pliers, Knipex is the way to go, for example, the 125mm Cobra.
In a pinch? If you’ve already got the separate tools a multitool is just a luxury item. Any half-decent hardware store pliers will do the trick. Look for ones with slimmer jaws, you will not be applying huge forces (or shouldn’t have to), but you will be getting into some tight spots.

Flashlight / Headlamp
If you’ve ever set foot on a studio set you know that it does not take a night shoot to get you in the dark. From rummaging through your floor bag to lighting the slate, a flashlight is an essential camera assistant tool.
Which one? The type of flashlight you’d like to work with is a personal choice. Chances are you won’t be needing anything exceedingly bright. In fact, when lighting a slate you don’t want an overly bright light as it will just end up as a washed-out square in the frame. If you get an adjustable power flashlight, make sure you know how to operate it fast. There’s nothing worse than fumbling with a blinking mess of a flashlight in front of rolling cameras.
A good quality headlamp is better than a regular flashlight, as it leaves your hands free to work. It’s better to get one with replaceable batteries so that you’re not stuck in the dark waiting for it to charge. Sustainability is important too, so do use rechargeable batteries.
In a pinch? Your smartphone’s light can get you by, but it’s generally not a good idea to hang around set with a phone in your hand all the time.
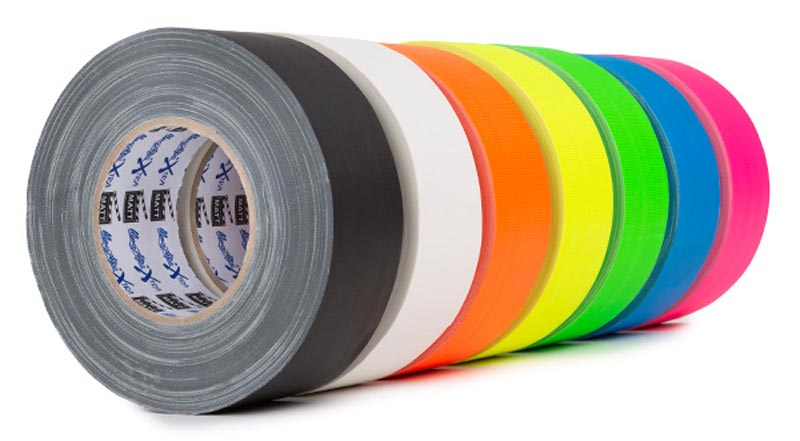
Camera Tape
Coming to the consumables end, we start with the one thing everyone associates the camera department with – gaffer tape. Aside from its thousands of legendary applications, gaffer tape is mainly used to mark actors’ positions and label equipment.
The tape is usually supplied by the production together with other consumables such as batteries, canned air and lens cleaning supplies. However, not every production does so, and every camera assistant is more or less expected to have some tape on them. If you’re just starting out, you might want to buy a couple of rolls in for peace of mind. If you know the focus puller or other ACs you’ll be working with, it might be worth checking with them to see if they have a roll to spare.
Which one? Pro Gaff has one of the most extensive line-ups. Scapa, MagTape and ShurTape are also popular options. If you are buying or ordering some, know that tape color is important on set. It usually goes like this: A camera and accessories are marked with red, B cam – blue, C cam – yellow, D cam – green and so on. And respectively, when marking actors you also generally follow the same order – main actor – red, supporting – blue and so on. Of course, this is a rough starting point. Check with the crew you will be working with to see who prefers what, but make sure you are all on the same page.
Some ACs prefer to use colored paper tape for certain tasks, due to it’s lower tack adhesives and environmental impact. Key among those is the black paper Shurtape Photo Tape. It’s usually put on the mattebox as a sort of mask to block on-axis light that french flags don’t cut. It can also be used in all sorts of light-blocking applications, like taping over camera lights showing in reflections etc. Bear in mind that paper tape does not fare well in wet weather.
Apart from these, there are a couple of more type of tape you might find useful on set. Scotch Magic Tape is a must have for 1st ACs, it’s the perfect tape to cover those remote follow focus rings to prevent your marks from sticking around longer than intended. A roll of Gorilla tape is also nice to have for more serious taping endevors.
In a pinch? Hit the local art shops or hardware stores and look for colored masking tape. At the very least, they will have white and blue, maybe some other colors. Not ideal, but it will mostly get the job done while you wait for the real deal.
For more info on how to make a kick-ass consumables list for your next project check out our brand new Camera Assistant Guide to Essential Consumables!

Chalk
Chalk is used to mark actors’ positions outside where tape is impractical. We’re not going to go in the details of marking here, as it’s an art of itself. Suffice to say that having a couple of chalk sticks in your pouch is a good idea. Tip! Put them in a small ziplock bag to avoid coating everything else in there in chalk dust. If you want to be fancy, grab some chalk holders. Do consider getting some T-marks too!

Canned Air & Blower
Canned air or a rocket blower is used to clear dust of delicate surfaces like the lens elements, filters, camera sensors and displays. Air is used to blow the lint off after cleaning a lens with a wipe, as simply blowing with your mouth is generally not a good idea. High-pressure air is also used to clear the camera’s heat sink and various nooks and crannies after shooting in a dusty environment. Make sure to turn the camera off before blowing against any fans, as they may be damaged otherwise.
Canned air is another consumable generally supplied by the production. Again, it’s expected of a seasoned camera assistant to have some even if not supplied. Luckily, for the most part you can get by with a rubber blower like the Giottos above. Using the blower is not only more environmentally and budget-friendly, but also safer for less experienced ACs.
If you tilt or shake a can of compressed air (which contains, in fact, anything but air) during use it can spit liquid propellant on whatever it is you are cleaning. The propellant then goes on to supercool the surface it’s on, which can be catastrophic for a delicate lens or a sensor. The rocket blower may not be as effective as canned air for clearing dusty heatsinks, but it’s good enough for pretty much anything else. Even if you have canned air, it’s a good idea to keep the rocket blower close by.
Which one? DustOff is a popular choice in the US, while the UK industry mostly runs on KenAir. Apart from nozzle designs, there’s not much difference. As for blowers, the Giottos Rocket Blower is one of the most common models.
In a pinch? Every camera store or bigger electronics outfit should have a blower in stock, some even stock compressed air cans. Failing that, and if you don’t mind some awkward looks, you can hit the pharmacy and look for a hygienic douche, it’s known to work just as well.
Lens Wipes & Cleaning Fluid
Last but not least on the consumable side of things come lens cleaning supplies. Lens cleaning is a somewhat controversial topic among camera assistants, and everyone’s got their own process. We’re not going to get into the details here, as it’s a topic that warrants it’s own article. The one overarching golden rule is: Less is more. Only wet clean a lens if you have to. Most of the time, those few specs of dust will blow right off.
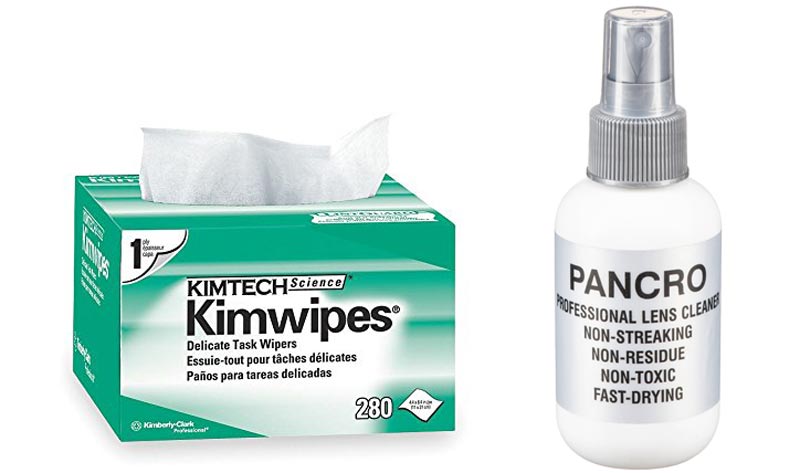
However, the time you do have to wet clean a lens (or a filter) will come, so you need to be prepared. On many sets, this is only done by the focus puller, and they will usually have their own supplies, but it’s expected that a 2nd AC is prepared too. As a minimum, you need some lens tissue and some cleaning fluid.
Which ones? Kimtech Delicate Task Wipers and Pancro Professional Lens Cleaner is the industry standard combo. Rosco also makes fine lens tissues and cleaning fluid. Pre-packed single-use moist wipes like the Zeiss ones are also a great option.
In a pinch? Local opticians or pharmacies will surely have some lens cleaning fluid and tissues or pre-packed spectacle wipes.
Viewfinder Covers
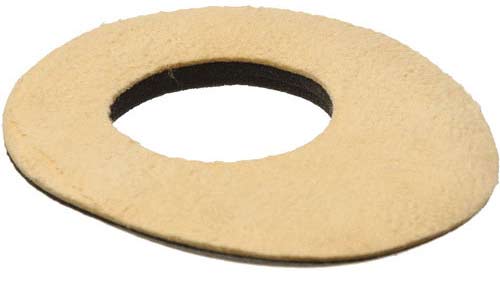
A bit of a more exotic consumable, viewfinder cushions (aka teddy bear assholes) are not as crucial but certainly good to have. They go over the rubber cushion of the camera’s viewfinder, making looking through it both more pleasant and sanitary for the camera operator. The cushions need to be changed regularly, especially in hot weather. An operator with an eye infection can be catastrophic for a film production, and viewfinder covers help prevent that.
If you shoot utilizes a lens finder type director’s viewfinder, do not forget to slap a cover on that too. Furthermore, a director’s viewfinder’s cover might need changing even more often than the cameras’. Compared to a camera, the lens finders tend to be handled and used by more people, so keeping proper hygene is even more important.
Which ones? Rubber viewfinder cushions are shaped differently on different cameras. ARRI Alexas have oval cushions, while RED and Sony use round. You need to get viewfinder covers that fit the camera you will be working with.
In a pinch? Viewfinder covers are a rather niche item, so finding a civilian substitute is unlikely. Failing to get the proper thing, the only thing you can do is to try and keep the rubber viewfinder cushion as clean as possible. It might be a good idea to give it a wipe with some sanitizer every now and then.


For the love of all that is holy, please add deodorant to this list!
You can wrap the soft side of Velcro around the end of the dry erase marker for erasing instead of getting a separate eraser.