
Ready to pull the trigger on your first personal monitor for focus pulling? Selecting a piece of gear that you will be working so closely with is a very personal endeavor. Like all things technological, picking a focus pulling monitor is becoming increasingly complex. Five years ago, there were all but two or three models to pick from. Today, each manufacturer has multiple product lines, featuring different sizes, panels and features. You’ve probably already encountered the most popular models, but some of them may not be available new anymore. In this article we will not be discussing particular models, but rather the specs and characteristics you should be looking at when you choose the best one for you.
We’d strogly argue against selecting a focus puller monitor solely off specs and reviews. Selecting a personal monitor for pulling focus is best done after you’ve had at least a few shoots with different rented monitors. Find out which current models are within your budget, and check to see which ones are in stock at the rental house you usuall use. It’s a good way to try different models in an actual production environment and see what works for you.
Of course, prep is crucial, especially in a project with gear you’ve not used before. Most rental houses are more than happy to give you several monitors during prep so that you can test and select the one you like best. Even though it’s no substitute for actual production work, this can help you narrow down the selection. If you know you are headed for a tricky shoot perhaps it’s not the time for experiments. In addition, get your colleagues opinions and meet up to try their kit if possible.
Size
A good starting point is perhaps the most important spec of a focus puller monitor – the size. It’s also the one for which personal preference and experience will help you make the right choice. In addition to sheer screen size and the related visual comfort, the size of your focus puller monitor will heavily affect your workflow. If you’ve already worked as a 1st AC for a while, you likely know the configuration and size you are after.
Ideally, it should also be suited to the type of production you are in. A studio based drama feature is rather different than a run and gun documentary in both pace and equipment requirements. If you want to work both, your kit should be able to adapt correspondingly. Knowing the type of production you will be predominantly working on will be hugely benefitial, but its a bit of a wishful thinking in the fast paced production world of today.
Overall, there are three general schools of thought on working with focus puller monitors, and they directly relate to size:

On camera
The most basic way of pulling focus on a cine camera is using a rod mounted follow focus. Traditionally, focus pullers would stand by the camera, gauge distance between the camera and subject, and pull focus using the witness marks on the lens’ barrel. When video taps and monitors were introduced in filmmaking, they were initally used mostly for framing reference, as the quality was not good enough to asess sharpness. The first AC monitors were mounted on the side of the camera, as no wireless link was available.
We’ve come a long way since then, and now pretty much every production has wireless video and follow focus systems. However, some focus pullers still prefer an on-board monitor and a traditional follow focus setup. It’s easy to see why – standing right next to the camera and having a direct connection with the lens barrel through the follow focus gear gives you an unparalleled tactile feedback. You can feel as well as see the camera movement, and you are close enough for the operator to whisper you a que or a change.
Due to weight and bulk, on-board monitors tend to be in the 5 to 7 inch range. Particularly well suited for this mode of operation are are SmallHD’s Ultra, Cine and Indie series. In addition to having excellent image quality and an abundance of tools to aid the focus pulling process, the monitors from these series offer the ability to control the camera through their touchscreen interface (requires a license and a dedicated cable). While most monitors from these lines offer camera control with RED cameras only, the Ultra 5 and the Cine 7 expand this ability to ARRI and Sony Venice cameras.
Typically, an onboard focus puller monitor will be mounted on the camera with a magic arm, sometimes also featuring quick release plates for easy changes in rigging. Of course, while providing the focus puller with immediate contact with the camera and operator, for certain situations this setup may not be ideal, or even possible. You’ll have a hard time pulling like that when the camera is on a steadicam, a gimbal or a crane. These are the situations where the next focus pulling mode comes in.
Handheld
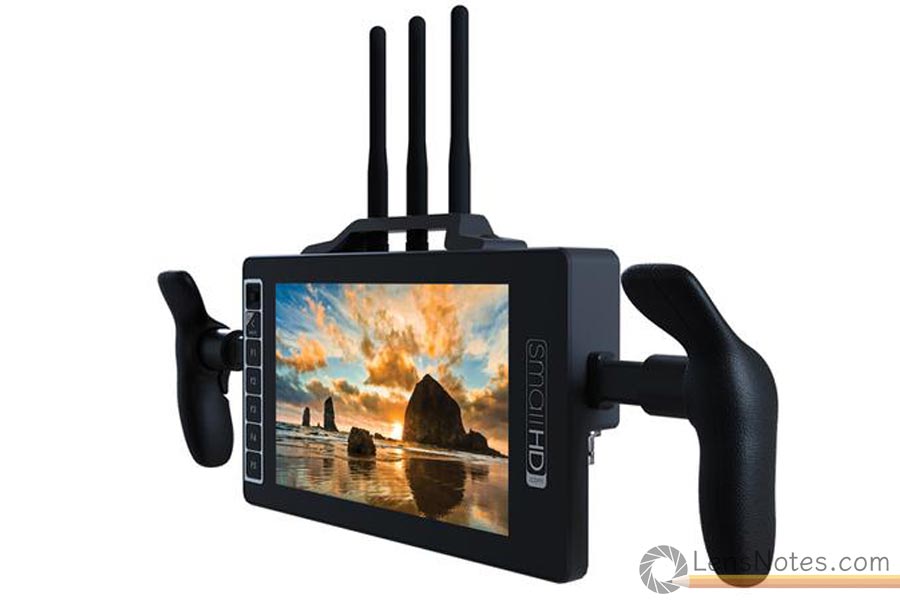
The second group of focus pullers prefer a more portable solution that allows them to get away from the camera when needed. Again opting for smaller 5 to 7 inch monitors, these ACs rig them with batteries, wireless video receivers and radio follow focus units. There are dedicated handheld focus puller station brackets made by Arri, Tilta and others that allow such rigging. Popular monitors for handheld focus operation include the venerable TvLogic VFM-058W, the Small HD 703 and the newer and significantly more affordable Feelworld FW703.
This way, the focus puller can be as close or as far (within reason) from the camera as they want, while retaining full control. The handheld monitor/radio focus combo is the most flexible way of focus pulling today, and is preferred by many assistants working in fast paced location based productions. It’s the go-to configuration for steadicam and gimbal ACs. Many of these assistants will dock the monitor to a stand between takes or when the scene allows.
Stand based
The last group of focus pullers prefer larger, stand based monitors for their main setup. This includes anything from the TvLogic LVM-095W-N , through the popular SmallHD 1303 and up to the 17 inch SmallHD 1703 or larger production monitors. With the proliferation of wireless follow focus, video and distance measurement aids, many ACs prefer to step away from the (usually) crowded set altogether. Standing on the sidelines, there’s a lot more space for a larger monitor and a more comfortable setup.
This is a popular way of working in the US, but is not as common on European sets. If the production you’re working on allows it, a large monitor is very nice indeed. If you are working a 12 week stage-only sitcom, for example, a large, bright screen will be much kinder on the eyes than a 5 inch handheld monitor. Many focus pullers working with larger monitors will also have a small, compact monitor rig for any tight spots or mobile situations.

Resolution
With HD 1920 x 1080 being the baseline resolution for digital filmmaking for quite a while now, you may be surprised that many of the industry standard monitors found on set today still fall short of this. The ubiquitous TvLogic VFM-056WP for example sits at 1280 x 800 pixels, as do the more recent SmallHD 5″ Focus Pro High Bright and 702 Lite. Lower resolution panels are mostly found on smaller monitors, anything larger than 7″ tends to be HD or better.
Lower resolution, in itself, is generally no big deal when it comes to everyday focus pulling. What affects it more is the scaling that the monitor has to do. Cameras and wireless transmitters, typically output a 1080p signal, which a lower resolution monitor has to crunch down to be able to fit it on the screen. It’s this downscaling that tends to eat sharpness and make your work as a focus puller harder.
Therefore, you are better off with a monitor that can natively show 1080p signal, which means a full HD panel. Pretty much all current generation offerings from the major manufacturers are FHD or better. 4K monitoring is still in it’s very early stages, with transmitters and monitors still being few and far between. A good quality FHD monitor will be plenty for a while still.
Brightness
Most manufacturers of monitors for filmmaking now offer their models in two flavours – regular and ultra-bright. The difference is pretty self-explanatory – the brighter the monitor, the easier it is to see in a bright environment. A brighter monitor will not need a sunhood or shading as much as a regular one, so it might make your life a little easier if you switch locations a lot.
However, ultra-bright monitors tend to come at a steep premium when it comes to price. Let’s take the SmallHD 7 inch line-up as an example. Their current flagship model, the 703 Ultra-bright features 2200 nits of brightness and is their most expensive 7 inch monitor. On the other side of the spectre, their budget oriented Indie 7 comes with only 1000 nits (which is still plenty for all but the brightest conditions) but costs less than half of the 703U.
Whether you pick one or the other depends on the type of work you do and the budget you have. The brightness of a monitor has nothing to do with image quality or sharpness. If you work exclusively indoors, there’s no point paying a premium for an ultra-bright. In a darkened studio most monitors will offer adequate brightness, it is outside where an ultra-bright will have an edge.
If you work mostly outside, or want to be ready to, the extra brightness is certainly nice to have if you can afford it. However, a good sunhood can make pretty much any monitor work in any situation. If you are on a budget, a regular-brighness monitor will still work if you put in a little extra effort.
Panel type
As with pretty much all screens on the market today, there’s also two panel types to choose from – LCD and OLED. Filmmaking gear manufacturers also offer their field monitors in both flavours. However, for the specific task that if focus pulling, there is an (almost) unanimous lean towards the traditional LCD panel type.
There are two reasons for this. First, monitors with LCD panels can be made significantly brighter than OLEDs. Put simply, in LCD panels the backlight is a separate light source, which can be made as bright as you like. In an OLED panel, each pixel is a light source upon itself, which significantly limits the maximum brightness that can be achieved. OLED is great for grading or screening as it can offer superior contrast and color rendition in controlled environments. However, for sheer visibility, it’s hard to beat a high-bright LCD monitor.
The second reason to choose a focus puller monitor with an LCD over an OLED panel is display lag. Technollogically, OLED display panels typically have a lot faster responce time than LCD. Thus, it comes as a surprise, but many OLED camera monitors on the market today exhibit a bigger lag compared to LCD models. This is likely due to processing and, as OLED is still rather new in this field, it will improve as the technology matures. However, it’s a point to consider, and if your mind is set on an OLED monitor, do some testing of your own before purchase.
In conclusion, for now you’re better off with an LCD monitor. As a more mature technology, it’s cheaper, brighter and more reliable. The advantages that OLED panels offer are pretty insignificant when it comes to focus pulling.
Connectivity
Like computers, cameras also use several different standards to output video signal, and you have to make sure your monitor supports the right ones. While HDMI is prevalent in compact cameras and mirrorless, professional grade equipment (think Arri Alexa) uses SDI almost exclusively. Ideally, you’d be getting a monitor that supports both HDMI and SDI, and most pro-grade ones do. In addition, some even support signal cross-conversion, allowing you to use the monitor as a signal converter.
As discussed above, in addition to video signal, some monitors offer camera control features. These are mostly implemented through ethernet ports, though some monitors, like the Portkeys BM5 III, may also use USB connections.
Features
Touch screen vs buttons
Many manufacturers have now introduced touchscreen controlled production monitors. However, ask anyone who works in professional filmmaking what they think about touch screens and you will get your answer. Do you think it’s a coincidence that Arri have not yet used a touchscreen interface on any of their cameras?
Even though touchscreens have come a long way, many assistants still find them finicky and unreliable in a high pressured production environment. Hardware buttons are simpler, easier and more reliable. In addition, let’s not get started on gloved operation or when rain covers are involved. Because of this, most manufacturers have been implementing hardware buttons in addition to their touchscreen interfaces, like SmallHD did with their latest Ultra 5 model.
Peaking & focus assist tools
Pretty much all filmmaker-oriented monitors today come with an array of exposure and focus assist software tools. There are different approaches to OSD menus, and some options are more polished than others, but all are pretty intuitive and essentially do the same.
TV Logic monitors rely on a rather simplistic, classic OSD menu. SmallHDs have a more sophisticated OS, which allows you to make different presets or “pages” that make switching between different configurations fast and easy. In addition, SmallHD’s partnership with Teradek has produced a unique feature. If you are using a Teradek CTRL.1 or CTRL.3 focus hand unit and a SmallHD monitor running OS3 or later, you can connect the two with a cable and get focus ring distance overlays right over the monitor image.
Wireless
With the introduction of the SmallHD Bolt series of monitors with built-in Teradek HD video receivers, a new variable was introduced in the focus puller monitor dilemma. The appeal of the built-in receiver is obvious – it’s lighter, sleeker and easy to use. However, it also poses certain limitations.
For the built-in receiver to work, you need a compatible transmitter mounted on the camera. You can either supply this yourself, or rely on the wireless video assist package supplied with the camera equipment to be compatible with your monitor. If it’s not, you will have to use an external receiver. Even if you have a transmitter, unless your package can completely replace the video assist’s, putting two transmitters on the camera is a recipe for interference disaster. You can see how this can become complicated.
A further liability of the monitor/receiver combo is serviceability. If anything happens to the wireless module of your monitor and you need to send it in for service, you are left without a monitor even if the screen itself works fine.
Finally, technollogy in wireless video seems to be moving a lot faster than that in monitors. Paying the steep premium for a monitor with a built-in receiver today, you risk it getting obsolete in a couple of years when new wireless standards are introduced. For me, personally, monitors with built-in video receivers seem to be more trouble than they are worth when it comes to focus pulling.

Recorder as focus puller monitor
Many focus pullers opt to use compact recorder monitors like the Atomos Ninja or the Blackmagic Design Video Assist. Apart from working as monitors, these devices allow you to record takes, so that you can review them privately, without bothering with video control or playing back from the camera. This can certainly come in handy when you want to double check your work without raising the alarm.
There are seversl disadvantages of using recorders as focus puller monitors. First, because of the added tech they tend to be larger, heavier and cost more while being less reliable than a comparable “dumb” monitor. Second, as recorders are not made with focus pullers as their main target market, most do not have the sharpest panels or sophisticated focus aids. Also, many recorders have fans for cooling, which can get you in trouble with the sound department.
However, the most important thing to keep in mind is that due to the extra processing they have to do, many recorder monitors have noticeable delay in the image. If you haven’t experienced it so far, beware, it can be disastrous for focus pulling. If you do want to try using a recorder as a focus puller monitor, I strongly suggest you try it in a production environment first.
Price
As with pretty much anything else in life, price matters. Cine equipment is not cheap, there’s no two ways about it. However, if you are buying a tool which helps you earn your living, it may not be something worth skimping on. A monitor is something you’ll be staring at day in and day out, so do yourself a favor and get a good one. You need a dependable, rugged monitor that will not let you down in the middle of a take, so a spending a little extra here will pay you back in the long run.


In conclusion, what would you suggest for use with a Sony A7iv? Do any of the 5-7″ monitors today offer onscreen touch focus pulling?
Please help. I cannot find this info online.
BIG THANKS
Lori
Hi Lori!
I’m afraid your options for touch screen focus with an external monitor are rather limited. The only monitor that seems to be able to do that out of the box is the PortKeys BM5 III WR, but I haven’t tested that camera/monitor combo personally. Another option for touch focus with an external screen is to connect the camera to a mobile phone/tablet and use that as a monitor. You can connect the devices using WiFi or USB, and will need to use Sony’s Imaging Edge app or a third party app like Monitor+.
Hope that helps!
Great summary and educational too! I work with a Sony A7SIII, and I also work as a 1st AC, and now I plan to get a slightly more professional monitor. The selected monitor would be the new SmallHD Cine 5 monitor. I used to work with 5-inch monitors several times, like 1st AC. However, I’m curious about your opinion. Would the new Cine 5 monitor be a good choice for this purpose?
The Cine 5 is certainly a beast of a monitor. You might want to also have a look at the brighter Ultra 5 you’re often working outside in the sun. What monitor have you used so far? What I’ve found is that when upgrading a monitor, it’s usually worth sticking to the same brand, as you get used to the layout, color rendering and sharpening algorithms. If you’re a TvLogic guy, a used 058 is perhaps still their greatest 5 inch option.
I worked with FEELWORLD monitors. But their image quality is getting a bit… lacking, so to speak. That’s why I would like to invest in a more professional monitor. I’m very hesitant whether 5′ would be enough, or whether 7′ should be enough, saying that the display should be a notch bigger.
The best way is to test a few monitors to see what fits your workflow the best. The right size really depends on what you’ll be using the monitor for. For small, run and gun handheld projects with the A7SIII, a bright and lightweight 5 inch monitor might make more sense. For standalone focus pulling, a 7 inch will probably make your job a bit easier.
If you don’t have a particular reason for sticking to a 5 inch monitor, I’d pick a 7 inch as the more flexible tool. If you can afford a nice 7 inch monitor like the TvLogic F7HS or the SmallHD Indie 7, you’ll be pretty much set for any challenges a job might throw at you.