What is zone focusing?
Zone focusing, also known as scale focusing, is the practice of pre-setting the focus ring of a lens at a predetermined distance. A completely manual process, zone focusing relies on depth of field and anticipation of the location of the subject. It requires good depth perception and understanding of the main principles of photography – aperture, shutter speed, focal length and depth of field. This guide assumes you are already familiar with the basic concepts.
You will often hear the term hyperfocal distance in relation to scale focusing. We will get to that in the following chapters. You might also hear about the circle of confusion and it really can be as confusing as it sounds. The concept is related to zone focusing, but is best covered in another article.
Zone focusing is one of the quickest and easiest ways to work with a manual focus camera, but it also has it’s place in an autofocus world. It enables you to eliminate focusing delay for candid shooting and is very popular among street photographers. Elements of the practice of zone focusing can be found in the job of focus pullers in filmmaking.
How does zone focusing work?
There are several steps to zone focusing, and the process is largely dependend on exposure settings. Coming from an autofocus workflow, scale focusing might seem overwhelming at first. However, the principles behind it are basic enough that it quickly becomes instinctive. Even if you are an autofocus shooter, mastering zone focusing will add a valuable tool to your arsenal, as well as deeper understanding of the photographic process.
What do I need for zone focusing?
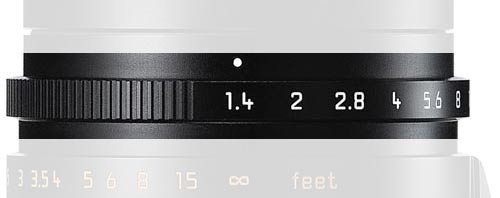
At the most basic level, to practice zone focusing you just need a camera with a lens that can be focused manually. It is possible to zone focus any lens on any camera that allows for manual focusing, but there are certain features that can make your life easier. If you plan on working with zone focusing regularly, you will need a lens with focus distance markings and ideally, a depth of field scale like this Leica Summilux-M 35mm f/1.4 lens.
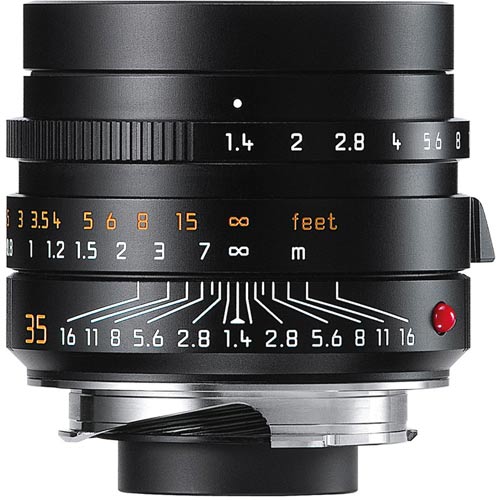
If you are not familiar with this lens type, it posseses two adjustable rings. The top one, with markings 1.4, 2, 2.8 etc. is the aperture ring. Most manual focus lenses have such rings, although it’s location can vary.
The lower one, with orange and white numbers is the focus ring, in this case marked in both feet and meters. Turning this ring moves the focus point of the lens correspondingly.
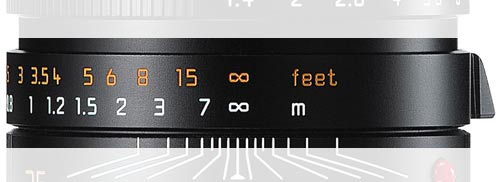
Below it is the key component of the zone focusing system, the depth of field table. Take note that this element of the lens is fixed, even though it might look like a ring. It is the reference to which the focus ring is adjusted. Depth of field is a function of the lens’ focal length, aperture and focus position. The depth of field table is a convenient way of representing the position of the
Setting the exposure
The first step to zone focusing is to find out your exposure settings. You can use the camera’s built-in expsure meter, a standalone one or even a smartphone app. Once you have the numbers, you have several decisions to make. For example, our meter has shown a correct exposure at f/5.6 with shutter speed 1/125 sec. We set the camera speed dial at 1/125 sec. and set the aperture ring of the lens at f/5.6. Now its time to focus!
Setting the distance
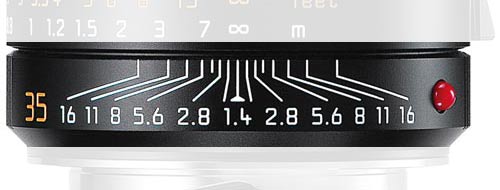
Once we have our exposure dialed in, we can have a look at what depth of field it gives us. This is the step where you have to think about how far your potential subject is going to be in order to pre-focus the camera at that distance. As an example, lets refer to the Summilux 35mm lens above.
Let’s say that we want to take some street photographs of people walking by a but stop. We estimate the distance between us and the subjects would be somewhere in the region of 3 meters. Refering to the scale of the Summilux, we see that if we place the focus at 3 meters, at f/5.6 we are going to get acceptable focus from just over 2 meters to about 5 meters. This is good, as it allows for some wiggle room, in case a subject pops in nearer or farther away from the lens. If you think this is sufficient, you can now leave the focus ring there and concentrate on shooting without worrying for focus.
But, for the sake of the experiment, let’s say that you want a bit more flexibility. Maybe there are some people crowding around the bus stop closer to you, and you’d like them to be in focus too, without compromising the original composition. What you can do is to stop down the lens and get increased depth of field. If you stop down to f/8 your depth of acceptable sharpness now spans from under 2 meters to almost 8, all without moving the focus ring. Of course, stopping down requires you to adjust the shutter speed appropriately. If we say that lighting conditions have not changed, you need to go from the original 1/125th to 1/60th to retain proper exposure.
Hyperfocal distance
When you have no particular subject in mind, it might be a good idea to stick with the hyperfocal distance of the lens at the given aperture. Hyperfocal distance basically means that we set the lens so that the depth of field available at the given f-stop is positioned from infinity to the closest possible distance.
If we continue working with a f/5.6 aperture, then we can see that with the focus ring set at infinity the field of sharp focus will start at just under 7 meters away from the focal plane. However, we can also see that a big part of the depth of field that a f/5.6 stop gives us is wasted beyound infinity. To utilize the depth of field , we simply need to position the infinity marker of the focus ring at the far (right) f/5.6 depth of field mark.
If we do this, we will see that the left f/5.6 depth of field mark is now at just under 3 meters. We’ve just gained a whole 4 meters of in-focus foreground without changing the f-stop or exposure. The lens is now set at it’s hyperfocal distance.
Zone focusing and film speed/sensor sensitivity
Because zone focusing is, in essence, a balancing act between exposure and depth of field, it’s not a surprise that film speed or sensor sensitivity is also an important part of the equation.
The deeper the depth of field you need, the smaller your f-stop has to go. The more you stop down, the longer your shutter speed needs to be. Play this scenario out, and you can see how you can quickly run into issues of motion blur. The only way to counter this, is to increase the sensitivity of your recording medium. With digital it’s easy, just bump up the ISO and you’re ready.
With film, you’ll need to be a more forward-thinking. If you anticipate that you’ll be using zone focusing a lot, and will be needing greater flexibility with your depth of field, it might be prudent to load a faster emulsion in your camera. If you’ve realised this a bit too late and you already have film in your camera, you might be able to set your exposure index (EI) a bit higher than the film’s box speed, and then push it a bit in processing.